7 On-Page SEO Checks That You Need To Conduct On A Periodic Basis
When it comes to SEO, we know that link building is an ongoing process, but more often than not, we tend to neglect the on-page SEO aspects.
Site updates, theme updates/changes, plugin updates, adding a new plugin/functionality, and other changes like updating a file using FTP can cause some accidental errors that could lead to on-page SEO issues. Unless you proactively look for these errors, they will go unnoticed and will negatively influence your organic rankings.
For instance, I recently realized that I had been blocking out images in one of my blogs for almost 6 months because of an old and neglected Robots.txt file. Imagine the impact such a mistake could have on your rankings!
On-Page SEO Checkup
Keeping the importance of SEO in mind, here are 7 important checks that you need to conduct on a periodic basis to ensure that your on-page SEO is on point.
Note: Even though these checks are for people running a WordPress blog, they can be used for any blogger on any platform.
1. Check your site for broken links.
Pages with broken links (be it an internal or external link) can potentially lose rankings in search results. Even if you do have control over internal links, you do not have control over external links.
There is a huge possibility that a webpage or resource that you linked to no longer exists or has been moved to a different URL, resulting in a broken link.
This is why it is recommended to check for broken links periodically.
There is a whole host of ways to check for broken links, but one of the easiest and most efficient ways is with the ScreamingFrog SEO Software.
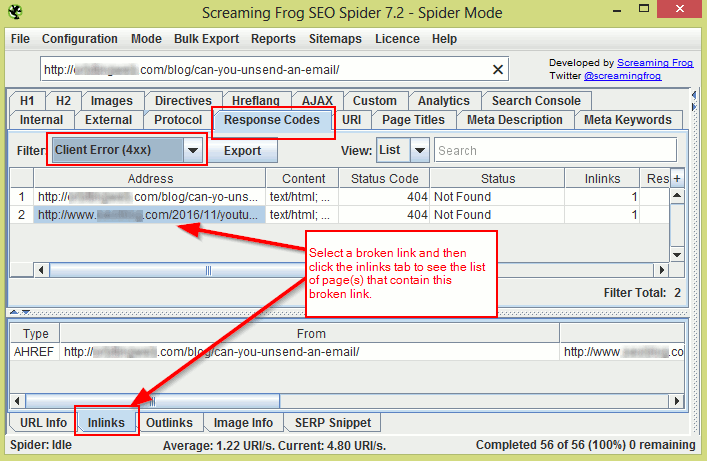
To find broken links on your site using ScreamingFrog, enter your domain URL in the space provided and click the “Start” button. Once the crawling is complete, select the Response Codes tab and filter your results based on “Client Error (4xx)”. You should now be able to see all links that are broken.
Click on each broken link and then select the Inlinks tab to see which page(s) actually contain this broken link. (Refer to image below.)
If you are using WordPress, you can also use a plugin like the Broken Link Checker. This plugin will find and fix all broken links.
Another way to check for broken links is through the Google Search Console. Log in and go to Crawl > Crawl Errors and check for “404” and “not found” errors under theURL Errors section.
If you do find 404 URLs, click on the URL and then go to the Linked From tab to see which page(s) contain this broken URL.
2. Use the site command to check for the presence of low-value pages in the Google index.
The command operator “site:sitename.com” displays all pages on your site indexed by Google.

By roughly scanning through these results, you should be able to check if all pages indexed are of good quality or if there are some low-value pages present.
Quick Tip: If your site has a lot of pages, change the Google Search settings to display 100 results at a time. This way you can easily scan through all results quickly.
An example of a low-value page would be the ‘search result’ page. You might have a search box on your site, and there is a possibility that all search result pages are being crawled and indexed. All these pages contain nothing but links, and hence are of little to no value. It is best to keep these pages from getting indexed.
Another example would be the presence of multiple versions of the same page in the index. This can happen if you run an online store and your search results have the option of being sorted.
Here’s an example of multiple versions of the same search page:
You can easily exclude such pages from being indexed by disallowing them in Robots.txt, or by using the Robots meta tag. You can also block certain URL parameters from getting crawled using the Google Search Console by going to Crawl > URL Parameters.
3. Check Robots.txt to see if you are blocking important resources.
When using a CMS like WordPress, it is easy to accidentally block out important content like images, javascript, CSS, and other resources that can actually help the Google bots better access/analyze your website.
For example, blocking out the wp-content folder in your Robots.txt would mean blocking out images from getting crawled. If the Google bots cannot access the images on your site, your potential to rank higher because of these images reduces. Similarly, your images will not be accessible through Google Image Search, further reducing your organic traffic.
In the same way, if Google bots cannot access the javascript or CSS on your site, they cannot determine if your site is responsive or not. So even if your site is responsive, Google will think it is not, and as a result, your site will not rank well in mobile search results.
To find out if you are blocking out important resources, log in to your Google Search Console and go to Google Index > Blocked Resources. Here you should be able to see all the resources that you are blocking. You can then unblock these resources using Robots.txt (or through .htaccess if need be).
For example, let’s say you are blocking the following two resources:
You can unblock these resources by adding the following to your Robots.txt file:
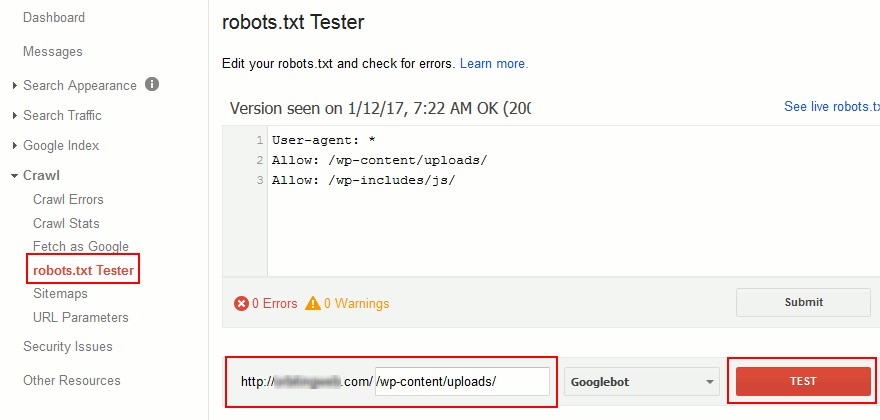
To double check if these resources are now crawlable, go to Crawl > Robots.txt tester in your Google Search console, then enter the URL in the space provided and click “Test”.
4. Check the HTML source of your important posts and pages to ensure everything is right.
It’s one thing to use SEO plugins to optimize your site, and it’s another thing to ensure they are working properly. The HTML source is the best way to ensure that all of your SEO-based meta tags are being added to the right pages. It’s also the best way to check for errors that need to be fixed.
If you are using a WordPress blog, you only need to check the following pages (in most cases):
- Homepage/Frontpage (+ one paginated page if homepage pagination is present)
- Any single posts page
- One of each archive pages (first page and a few paginated pages)
- Media attachment page
- Other pages – if you have custom post pages
As indicated, you only need to check the source of one or two of each of these pages to make sure everything is right.
To check the source, do the following:
- Open the page that needs to be checked in your browser window.
- Press CTRL + U on your keyboard to bring up the page source, or right-click on the page and select “View Source”.
- Now check the content within the ‘head’ tags ( <head> </head> ) to ensure everything is right.
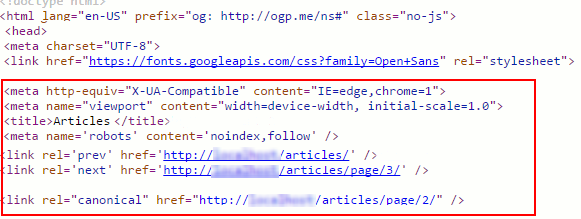
Here are a few checks that you can perform:
- Check to see if the pages have multiple instances of the same meta tag, like the title or meta description tag. This can happen when a plugin and theme both insert the same meta tag into the header.
- Check to see if the page has a meta robots tag, and ensure that it is set up properly. In other words, check to make sure that the robots tag is not accidentally set to Noindex or Nofollow for important pages. And make sure that it is indeed set to Noindex for low value pages.
- If it is a paginated page, check if you have proper rel=”next” and rel=”prev” meta tags.
- Check to see if pages (especially single post pages and the homepage) have proper OG tags (especially the “OG Image” tag), Twitter cards, other social media meta tags, and other tags like Schema.org tags (if you are using them).
- Check to see if the page has a rel=”canonical” tag and make sure that it is showing the proper canonical URL.
- Check if the pages have a viewport meta tag. (This tag is important for mobile responsiveness.)
5. Check for mobile usability errors.
Sites that are not responsive do not rank well in Google’s mobile search results. Even though your site is responsive, there is no saying what Google bots will think. Even a small change like blocking a resource can make your responsive site look unresponsive in Google’s view.

So even if you think your site is responsive, make it a practice to check if your pages are mobile friendly or if they have mobile usability errors.
To do this, log in to your Google Search Console and go to Search Traffic > Mobile Usability to check if any of these pages show mobile usability errors.
You can also use the Google mobile friendly test to check individual pages.
6. Check for render blocking scripts.
You might have added a new plugin or functionality to your blog which could have added calls to many javascript and CSS files on all pages of your site. The plugin’s functionality might be for a single page, yet calls to its javascript and CSS are on all pages.
For example, you might have added a contact form plugin that only works on one page – your contact page. But the plugin might have added its Javascript files on every page.
The more javascript and CSS references a page has, the longer it takes to load. This reduces your page speed which can negatively impact your search engine rankings.
The best way to ensure this does not happen is to check your site’s article pages using Google’s PageSpeed Insights tool on a regular basis. Check to see if there are render-blocking Javascript files and figure out if these scripts are needed for the page to function properly.
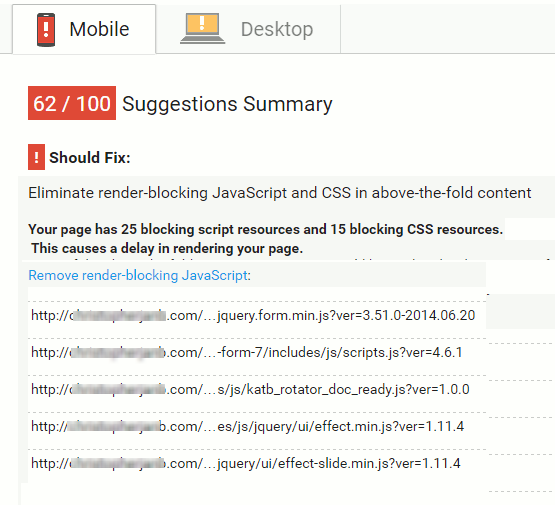
If you find unwanted scripts, restrict these scripts only to pages that require them so they don’t load where they are not wanted. You can also consider adding a defer or async attribute to Javascript files.
7. Check and monitor site downtimes.
Frequent downtimes not only drive visitors away, they also hurt your SEO. This is why it is imperative to monitor your site’s uptime on a constant basis.
There are a host of free and paid services like Uptime Robot, Jetpack Monitor, Pingdom, Montastic, AreMySitesUp, and Site24x7 that can help you do just that. Most of these services will send you an email or even a mobile notification to inform you of site downtimes. Some services also send you a monthly report of how your site performed.
If you find that your site experiences frequent downtimes, it is time to consider changing your web host.
Things To Monitor For Proper On-Page SEO
These are some very important things to check for so that your on-page SEO stays highly optimized.



Add the site UptimeControl.net to the article, because only they have a 3-minute site availability check interval on the free plan.
ReplyDelete